

Construction Submittal Process (Step-by-Step in SubmittalLink)
Submittals prove materials match the specs and give the design team a clear path to approve or comment before work starts. Email threads and spreadsheets cause drift—files scatter, due dates slip, and no one knows who has the ball. SubmittalLink centralizes creation, sequential reviews, CC visibility, due-date reminders, and an auto-generated coversheet so packages look consistent and move faster.
TL;DR
What you do
- Create submittal
- Fill basics
- Add description/due date/priority
- Attach PDFs
- (optional) Load a quick template
- Define review steps and CCs
- Auto-generate coversheet
- Send
- Track approvals
Why it matters
Cleaner packages, fewer email chases, predictable approvals, clear audit trail, and faster field readiness.
Learn more
See the bigger picture: construction submittal tooling and workflows here: https://www.submittallink.com/construction-submittal-software
Before You Start
Pick the project
If you manage multiple jobs, confirm the code/name before creating a record so numbering and notifications stay clean.
Load spec sections
The Spec Section dropdown draws from your project’s Spec Sections tab. Use CSI codes (e.g., 09 91 23 – Interior Painting) or custom labels that mirror your contract docs.
Gather attachments
Consolidate clean PDFs (shop drawings, product data sheets, SDS). Use clear filenames like trade_submittal-no_rev.pdf to speed scanning.
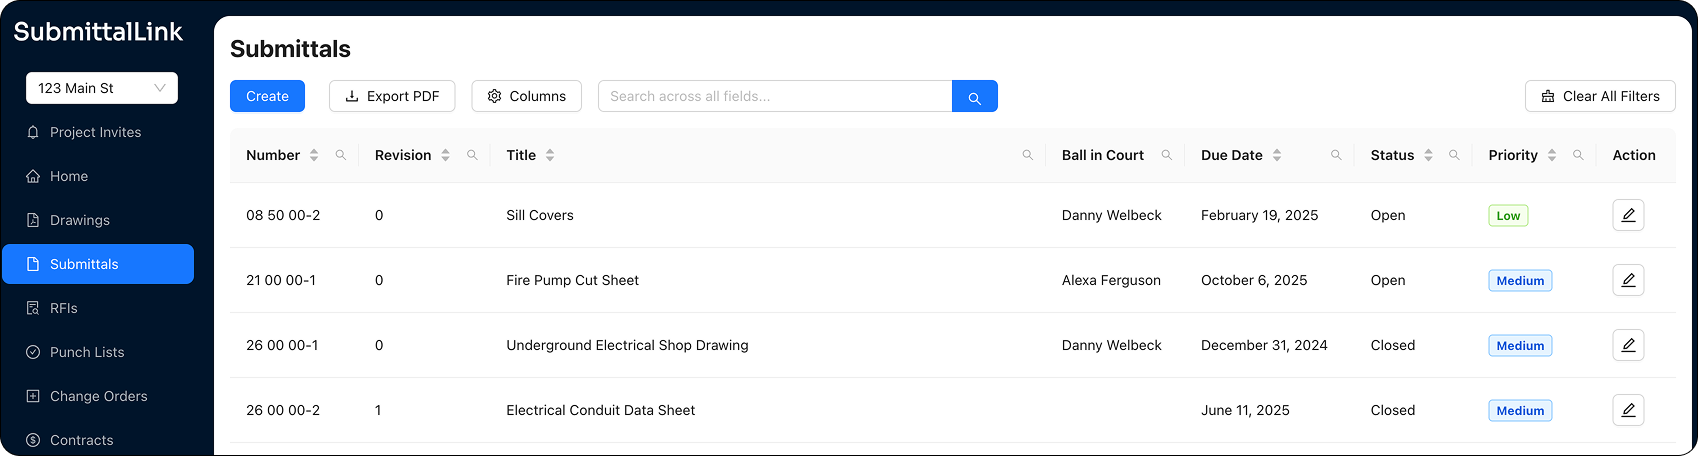
Step 1: Create the Submittal
Where to click
Projects → [Your Project] → Submittals → Create.
What you see
Core fields first (Number, Revision, Title, Spec Section, Manager). Fill these before adding reviewers and files.
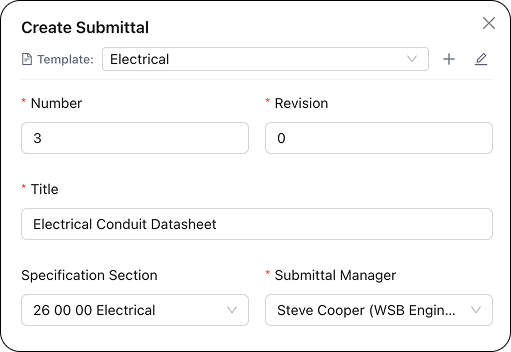
Step 2: Required Fields (Number, Revision, Title, Spec, Manager)
Number & Revision
Use a job-wide pattern (e.g., 033000-014). Start at Rev 0; bump to 1, 2, 3 for subsequent submissions. Don’t reuse numbers; if an item splits, give each a new Number to keep email trails and logs distinct.
Title
Be specific and scannable: “Hollow Metal Doors – Shop Drawings – Level 1” is better than “Doors.” Include trade + item + type.
Spec Section
Choose the governing section—this powers filters, reporting, and the correct review path.
Submittal Manager
Assign the person responsible for pushing the item forward (PE/PM). They’ll receive status pings and due-date alerts; reassign during PTO to prevent stalls.
Step 3: Description, Due Date, Priority
Description
Provide concise context reviewers need (scope, location, special details).
Due date
Set a realistic date based on lead time and field need. For multi-step reviews, the clock starts at Step 1 and moves forward as steps complete, so give upstream reviewers enough time and add a small buffer for long-lead items.
Priority
Use Low/Normal/High to signal urgency in emails and logs. Reserve High for schedule-critical items.
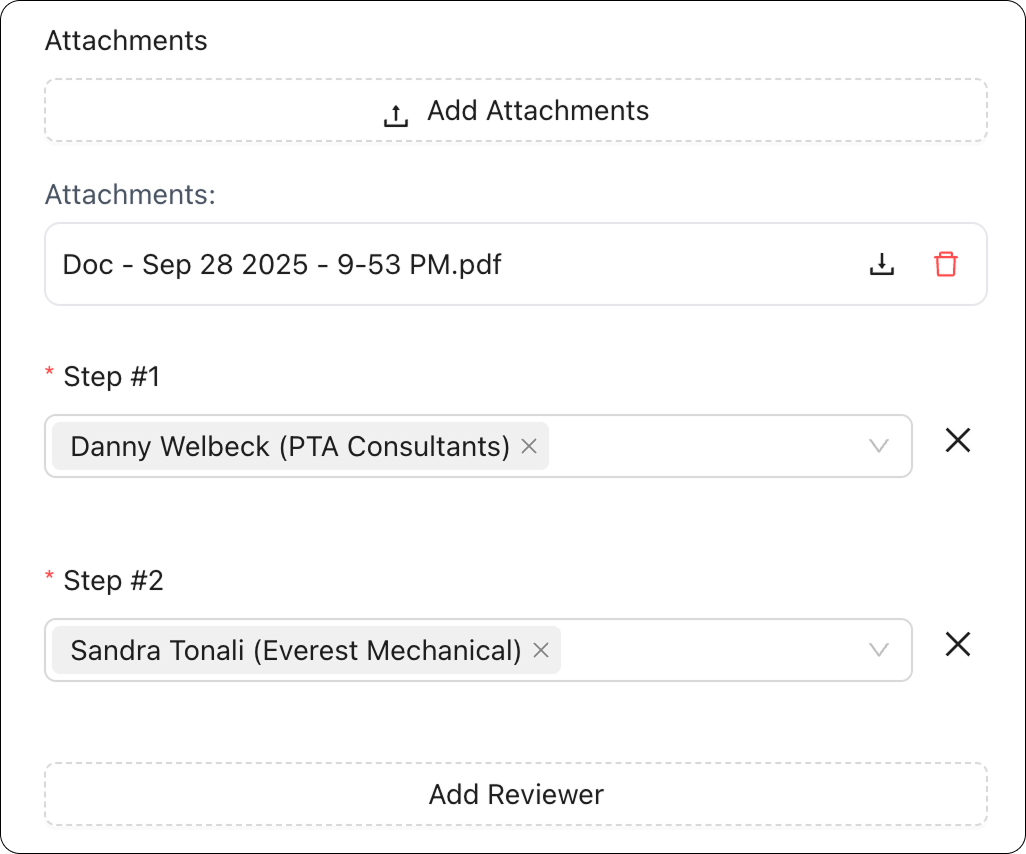
Step 4: Reviewers, Steps, and CCs
Sequential steps
Map the path: Contractor → Architect → Structural (or your sequence). Each step must finish before the next begins. Drag to reorder if needed. When a step closes, responsible party shifts automatically and the next step is notified.
Multiple reviewers in a step
Add, for example, Architect PM + Project Architect together. The step remains open until required reviewers finish. If someone is advisory only, make them a CC so they don’t gate the step.
CCs for visibility
CC stakeholders who need awareness (owner rep, superintendent, specialty subs). CCs receive emails and attachments but never hold the ball.
Related read
When to send an RFI vs. locate answers in approved submittals: https://www.submittallink.com/post/rfi-construction-software
Step 5: Quick Templates (Optional but Powerful)
What templates store
Spec Section, default review steps, default reviewers, due-date/priority rules, and any standard notes.
When to use them
For recurring trades (e.g., Doors & Hardware, Concrete Mix Design). Load template → tweak specifics → send. This reduces clicks and keeps consistency across the team.
Tips
Name templates clearly by trade and document type so new team members can pick the right one quickly.

Step 6: Attach Files & Enable Automations
Attach PDFs
Include shop drawings, data sheets, SDS. If you add CAD or spreadsheets, mention that in the Description. For revisions, make the filename obvious (e.g., “08 71 00 Door Hardware Rev 1.pdf”). For large sets, consider a compiled PDF with bookmarks to speed review.
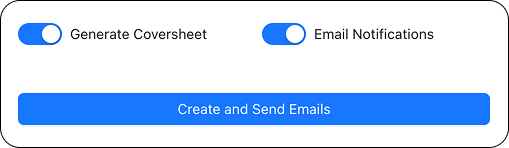
Auto transmittal (coversheet)
Toggle “Generate coversheet” to build a standardized first page with Number, Title, Spec Section, Due Date, and Reviewers, then auto-merge it at the front. No manual Word templates or PDF juggling.
Notifications & reminders
Reviewers receive one-click emails. Due-date reminders nudge the current responsible reviewer until the item closes.
Step 7: Create & Send
Pre-flight checklist
Confirm Number/Rev, Title, Spec Section, Reviewers, Due Date, and Attachments. Fixing small errors now saves days later.
What happens on Send
Instant emails go to Step-1 reviewers (and CCs for visibility). The email contains project, number, title, due date, any notes, and a secure review link. Attachments go out with the coversheet. Responsible reviewer updates to the first review step. Reminders auto-queue as deadlines approach.
Tracking, Revisions, and Closeout
Live log
Status and resposible reviewer are always visible so the team knows who owes action. Filter by Spec Section, reviewer, priority, or due date when running coordination meetings.
Handling comments and resubmittals
If reviewers request changes, upload a new revision, bump Rev number, and resend. Keep the Title consistent so the thread is easy to follow. The history log preserves the audit trail.
Schedule protection
For long-lead materials, set earlier due dates, use High priority sparingly, and break large packages into logical parts (e.g., Levels, Zones, or Trade subsets) to avoid all-or-nothing delays.
Field readiness
When approved, notify field teams and linked trades. Consider posting key approved submittals in the project’s shared folder with a predictable path so supers can find them quickly.
FAQs
Reviewers vs. CCs
Reviewers can approve/reject/comment and move the submittal forward when it’s their turn. CCs receive the same emails for awareness but never hold the ball.
Multiple review steps
Yes. Build Contractor → Architect → Engineer (or your required path). A step can include multiple reviewers notified at the same time. The next step starts only after the current one finishes.
How templates work
Save your common setup (spec, steps, default reviewers, notes). Selecting a template auto-fills the form; you can tweak anything before sending.
Resends and reminders
Due-date reminders run while open. If dates change, update the due date; reminder schedules follow automatically.
Can I edit after sending?
Yes (within permissions). Update fields, add attachments, or push a new revision. The log keeps history for compliance and closeout.
Next Steps
Try a live walkthrough
Book a 15-minute session and we’ll set up a submittal together, show how resposible reviewer and reminders keep things moving, and share best practices for multi-step reviews and templates: https://www.submittallink.com/contact-sales
Learn the ecosystem
Deeper primer on tooling and workflows for submittals: https://www.submittallink.com/construction-submittal-software
Related process: RFIs
Clarify when to issue an RFI vs. rely on contract docs or approved submittals: https://www.submittallink.com/post/rfi-construction-software